Homemade burgers

Nothing beats a good home made burger. You can pick the best meat and spice it just the way you like it. The same goes for all the other components, when you make burgers at home, get the best ingredients your money can buy. Burgers are actually a very honest recipe, where all the individual ingredients should shine.

Another advantage with making burgers at home is that it is good family fun. I like to make a platter with all possible toppings and sauces, and everyone builds their own favorite burger.

For all you busy parents out there: you can make your patties in a day in advance and keep them in your fridge. You can even prepare all the veg, and store these in an air tight container or a ziplock bag. When you want to eat your burgers all you still need to do is fry the patties.

Burger

Burgers ( for 4 burgers)

  • Patties:
    • 500 gr. minced beef
    • 1 tsp HP sauce
    • Salt & pepper to taste
    • 1 tbsp oregano
    • Optional: 1 tsp of paprika
  • 4 burger buns
  • Slices of good cheese, cheddar or dutch cheese will do
  • Ketchup and mustard to taste
  • Onion, sliced in rings
  • Tomatoslices
  • Crunchy salad leaves
  1. Combine the pattie ingredients in a bowl and mix gently with your hands. As this is beef, I recommend tasting to test if your have seasoned it properly.
  2. Devide the mixture into 4 portions and mould these into burger patties. They should be less than 1 cm thick and match the size of your buns.
  3. Now you can let your burgers rest in the fridge for 15 minutes to 24 hours. I like to coat my patties with a thin layer of oil to prevent them sticking to the plate. I cover the plate with cling film.
  4. When your table is set and your side dishes are ready, fry your burgers in a pan or griddle on high heat. Thanks to the layer of oil, you don’t have to add oil to your pan.
  5. You can test how well done your burger is by pressing it in the centre, when it is more firm, it’s more cooked. I recommend experimenting a little here and find out what your favorite cooking time is.

We like having oven baked chips with our burgers.

Need a good vegetarian alternative? My beetroot burgers taste just as good on a burger bun.

Breadsticks

This iBreadstick3s the perfect thing for dinner parties. It makes a great side dish with starters like soup or salad. It is also a great way to finish pastry leftovers.

I like to serve bread sticks in a pretty glass, which makes them a decorative item as well.

You could also serve these tasty sticks with a good dip.

To make the bread sticks, simply brush strips of puff pastry with egg, then sprinkle with pepper, salt and any toppings you like, such as grated cheese, seeds and spices such as paprika, thyme or rosemary.

BreadStick1

Read more soup recipes or salad inspiration.

Chicken fingers

ChicknChipsIn our family, we love making our own fast food. Our favorites include hamburgers and chicken fingers. This is an easy way to make the most tender chicken breast you will ever taste!

Chicken fingers (2-3 portions)

  • 2 chicken breasts, cut into 1 inch wide, long strips
  • Chicken marinade
    • 1,5 cups of buttermilk (or watered down yoghurt)
    • 1 tsp sweet paprika
    • 1 tsp oregano
    • salt & pepper to taste
    • 1 garlic clove, crushed
  •  Crust:
    • 200 grams bread crumbs
    • 1 tsp sweet paprika
    • 1 tsp oregano
    • 1 tbsp sea salt
    • 1 tsp pepper
  • 200 ml of sunflower oil for shallow frying
  • Dip:
    • 1 cup of sweet chili sauce
    • handful of koriander, finely chopped

ChickenFingers

  1. Cut your chicken, and mix with the marinade ingredients. Marinade the chicken for 30 minutes to 24 hours in the fridge.
  2. Combine ingredients for the crust.
  3. Prepare your chicken fingers:
    • Shake each finger off.
    • Place in your crust mix, you will find the buttermilk acts as the perfect glue for the crust.
  4. Warm up your oil. Preheat your oven to 220 degrees C (the perfect temperature for making chips in your oven!).
  5. In small batches, fry your chicken fingers, turn the chicken fingers after they have brown on one side. Take your fish fingers out of the oil, in a dish in the oven.
  6. Combine the ingredients for the dip.

Read more chicken inspiration, and the recipe for chips.

Fabulous five: oven dishes

I love making oven dishes for my family. Here are some of the reasons why:

  • They fit in my busy schedule. You can often assemble the dish in advance, store it in your fridge or freezer, and warm and crisp it up in the oven when you want to eat it. This means I often make multiple oven dishes in the weekend which can be warmed up after a busy day in the office.
  • They are healthy. For my oven dishes I use lots of fresh veg and homemade sauces. All I do is warm the ingredients up. Oven baking a dish filled with fresh ingredient, in my mind, is a lot better than a microwaving or frying instant meals.
  • They are easy to prepare. Once your oven dish has been made, any family member that knows how the oven works can prepare dinner. While the dish cooks in the oven, we have time to relax or play, or the rest of the family can drive home from work.

These are our family favorites:

  1. Traditional lasagna with bolognese sauce and a bechamel and crusty top
  2. Moussaka – our tasty vegetarian version
  3. Spinache lasagnespinach
  4. Gnocchi bake
  5. Shepards pie – I like using leftovers from a stew and covering this with a layer of mashed potatoes.


Gnocchi bake

This dish may take you 40 minutes to make, but it is less than 10 minutes work to prepare. You can even create the whole bake a day or two in advance. Which means any person who can operate an oven can finish the dish when you want to eat it.

Gnocchi is a kind of pasta made from potatoes, which gives them a great chewy texture. I like making this pasta myself, but this dish is my “go to” when I want an easy meal.

If you have little oven dishes. You could also make individual servings.

I like to serve a green salad with this dish for some extra veg.

Gnocchi bake (3 portions)

  • 500 grams of gnocchi (1 pack)
  • 400 grams of my no fuss tomato sauce
  • 100 grams of cheese, pick your favorite melting cheese: grated Dutch cheese, cubes of blue cheese and/or mozzerella
  1. Boil the gnocchi for a couple of minutes, your gnocchi is cooked when it floats on the surface.
  2. Strain the gnocchi and rinse with cold water to stop the cooking process.
  3. Mix the gnocchi and tomato sauce.
  4. Top with cheese.
  5. Now your bake is ready for the oven, or for your fridge.
  6. Bake in the oven at 220 degrees C for 30 minutes or until bubbly and golden.

Find more oven bakes here or more Italian dishes.

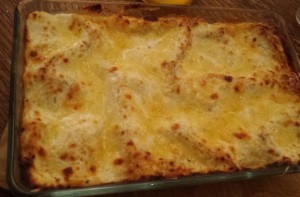
Spinach, egg and mushroom lasagne

This one of those vegetarian dishes which my family just loves. It is so full of flavour and different textures that everybody feels satisfied after eating this green lasagne.

spinach2Unlike a traditional lasagne, there is no need for endless simmering to create a rich sauce. This sauce is made by simply mixing the right ingredients. You might never have tried using egg in a lasagne before, but I can promise you it is a perfect match with the ingredients in this dish. It also helps you get you protein intake for the day.

Like an oven bake, I like to make this dish a day or two in advance. This helps me stay organised with our busy schedules.

If you are an avid meat lover you could easily add bacon cubes or pancetta to the mushroom mix.

Spinach, egg and mushroom lasagne (3 portions)

  • 300 grams of spinach (sliced and frozen, or stir fried and finely sliced)
  • 250 grams of (button) mushrooms
  • 1 onion, finely sliced
  • 1 clove of garlic, finely sliced
  • 500 grams of “kwark” (replace with cottage cheese and/or creme fraiche)
  • 120 grams of grated cheese
  • 3 eggs, hardboiled
  • lasagne sheets, about 150 grams
  • oven dish of 25 by 35 cm, or a similar size

spinach

  1. Fry your onions, mushrooms and garlic until brown and soft.
  2. In a mixing bowl, combine the spinach, mushroom mix, half of the “kwark” and half of the cheese.
  3. Season the filling with salt, pepper and a pinch of nutmeg.
  4. Now you are ready to make your layers:
  5. A layer of filling, topped with lasagne sheets.
  6. Top the sheets with more filling and your sliced egg. Season your egg and top with lasagne sheets.
  7. Another layer of filling, topped with lasagne sheets.
  8. For your final layer. Mix half of the leftover cheese with your kwark and season. Spread this mix over the lasagne sheets.
  9. Top your bake of with a sprinkling of grated cheese.
  10. Now your lasagne is ready for the oven, or for your fridge.
  11. Bake in the oven at 220 degrees C for 30 minutes.

Find my favorite oven bakes here.

Winter omelet

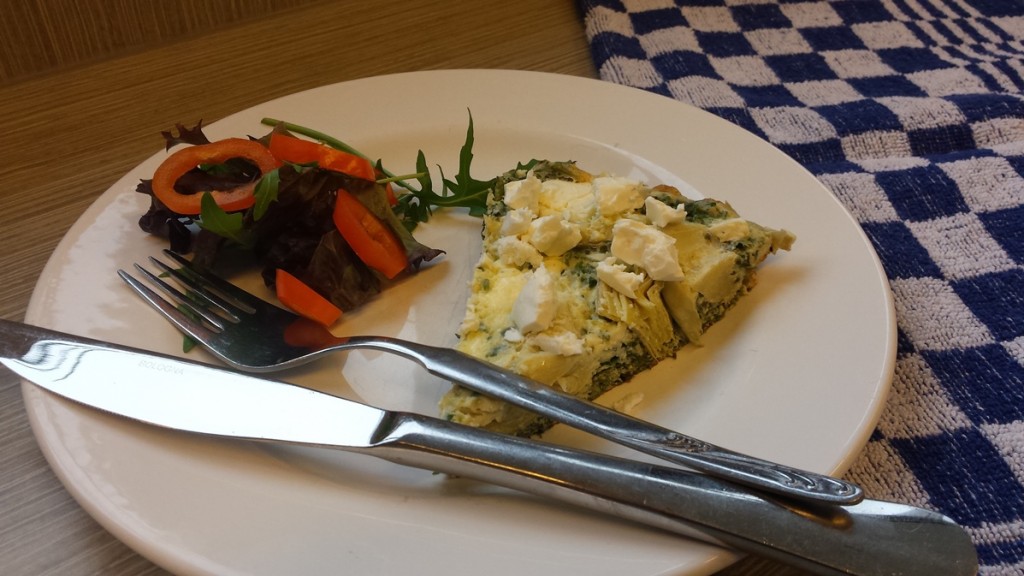
We love having curly kale in the winter. This healthy veg is full of flavor and nutrients. The other day I had some leftovers, which inspired me to create a tasty lunch. This omelet tastes great warm or cold. Making it an easy treat to bring for your worklunch as well.Omelet2

When I finished cooking this dish, I was worried that this healthy creation would have no flavor. However, the strong flavors of the kale, artishoke and feta come together beautifully. It is also very filling, making it easier for me to stick to my new years resolutions. My colleagues had a taste, and insisted I share the recipe, luckily it is surprisingly easy!

Winter omelet (2 – 3 portions)

  • 150 grams of finely sliced curly kale (could be replaced with cavolo nero or spinach)
  • 200 grams of (tinned) artishoke hearts, in wedges
  • 100 grams of feta
  • 2 eggs
  • 2 tbsp soft curd cheese, known as “kwark” in Holland
  • 1 tbsp of oil for frying

Omelet1

  1. Blanch your kale for one minute in boiling water.
  2. Drain and cool your kale.
  3. Mix the kale, eggs and soft curd cheese and season to taste.
  4. Heat a frying pan and add your oil. Get your pan as hot as possible.
  5. Add your mix and lower the heat right away.
  6. Spead the artishoke pieces over your omelet and push them in gently.
  7. Crumble your feta over your omelet and push in gently as well.
  8. Cover and fry on a low heat until your egg has set.

Enjoy your omelet with a salad and a glass of white wine!

Read all my recipes here!