Fabulous five: Cooking with toddlers

My toddler is always exploring the world and bursting with energy. From the moment he was born he has been observing me in the kitchen. From the moment he could, he has been my most eager little helper. I always indulge him and find a way for him to help me. I find it important he understands what he eats and he learns to appreciate how much work goes into making his dinner.

My toddler surprised me with his cooking. He loves to help create something, and he loves eating his creations. However grown-up I thought the recipes were, my son knows what he likes.

If you are wondering what your toddler can do in the kitchen here’s some things my toddler can do:

  • Knead, shape and roll out dough (as he has plenty of practice with play dough)
  • Cut soft food like mushrooms, cucumber, cheese with a table knife
  • Add ingredients and sprinkle seasoning
  • Pealing your boiled eggs
  • Stirring (although this does require lots of practice, my toddler toppled over the pancake batter once!)
  • Cleaning up afterwards, my toddler can really enjoy washing up, drying and placing utensils back in their right place.
  • Tasting and testing

A last and final warning for all young parents: lower your expectations. With their short attention span, toddlers help you for 5 minutes and leave a mess that might take you 10 minutes to clean up. Ironically, they will tell everyone they made this food (with no help what so ever, haha). With time, this will improve, and I promise you the pride on their faces when they get to eat their creations makes it all worth while!

These are our favorites recipes:

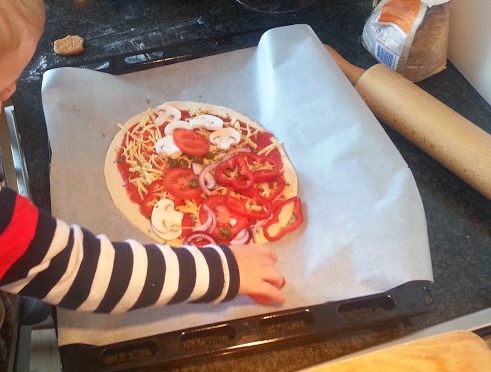
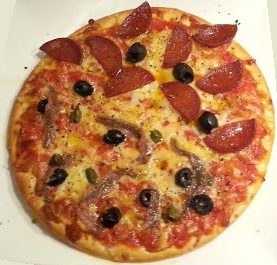
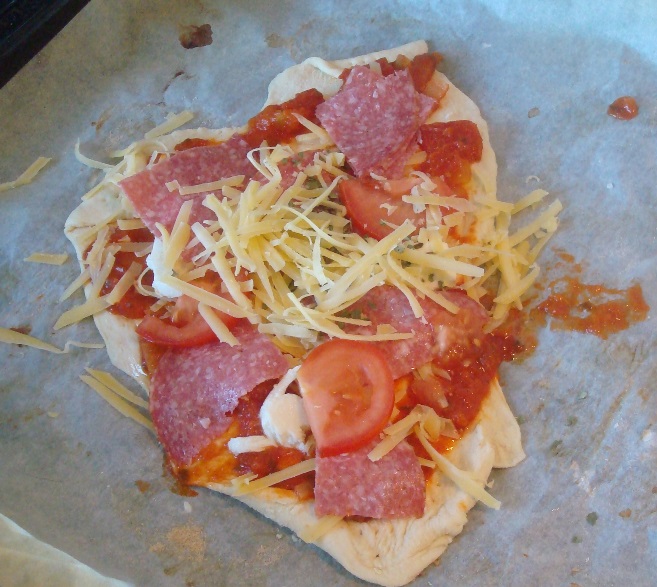
1. Pizza – my toddler gets to pick his own toppings. When his creation is done, he can’t wait till the pizza has finished baking. Find the recipe for pizza dough or our favorite topping.

???????????????????????????????

2. Cookies – I make the dough beforehand (without my busy toddler slowing me down). The dough rests in the fridge until my son and I have a moment to make cookies together. We still want to make funfetti cookies together some day!

3. Pancakes – my toddler loves helping me mix the batter and we break eggs together, doesn’t any toddler love breaking stuff? He is in charge of ladling the batter in the pan, I am in charge of frying and flipping the pancakes in the air. Find my pancake recipe here.

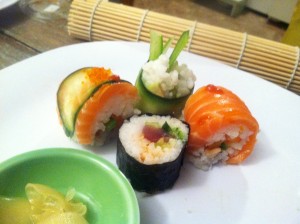
4. Sushi – making simple sushi is perfect toddler fun. My toddler eats the (healthy) ingredients before they are even made into sushi! Molding the rice and placing the ingredients in the roll is his task and mommy rolls the sushi and we eat them together.

5. Bread – my toddler loves kneading dough with me. He gets to mold his own rolls, brush them and sprinkle them with his favorite seeds. You could also let your toddler make bread sticks.

Fabulous five! Mothersday

Mothers day is in exactly 1 week (in the Netherlands). My mom is getting a homemade gift, from the heart. Here are my top 5 picks;

  1. My mom loves reading. A personalized bookmark would be a good idea!
  2. A heartfelt sweet message on a board or a card
  3. Make an egg cosy with some felt! Perfect combined with a surprise breakfast in bed!!

    through Ariadne at home

  4. Say it with food! Bake a special apple pie
  5. Make a simple and personal card

Car garage birthday treat

Every year it’s a challenge, what will may toddler hand out at his day care. This year i made a garage full box full of car shaped treats.

Justlovecars

The cars

I made these cars by wrapping raisin boxes in colored paper. I glued some dutch “pepernoten” on the boxes using a thick icing made with icing sugar and some drops of egg white.

The garage

I upcycled a delivery box to make the garage.I first wrapped it, to hide the ugly box. I used strong black strips of card board. When my toddler starts playing, he can be a bit rough. This is why I connected all the strips with cello tape.

Perfect Pizza Paluzza

Thanks to a sweet friend of mine, I am the proud owner of the Italian cooking bible “the silver spoon”. The book itself ways several kilo’s, but is worth all the shelf space it occupies in my book cupboard.

My Italian cooking bible

What you notice when you leaf through this book is how delightfully simple the Italian cuisine really is. Few ingredients are used to make the star of the show shine. I would recommend this book to any starting home cook.

One of my favorite recipes from “The silver spoon” is pizza. I use the recipe for making pizza dough but for the toppings I let my guests decide. I knead the pizza dough the evening before. I let the dough proof in the fridge. This means that making the pizza’s takes little time on the day itself.

My toddler loves pizza. From the moment we bought his kitchen stool he has been joining me to “help” with my cooking. And pizza is the perfect opportunity for this because:

  • Your toddler can help you knead the dough. Simply give your toddler a small portion of the dough and continue kneading together. My son loves pushing his fingers or fists into the dough! Simply combine the dough every now and then, and give your toddler a new ball to knead.
  • Your toddler can help dusting your work top and roll out the dough. At this point in time my toddler runs to the kitchen  cabinet container a big and a small rolling pin. My toddler is so experienced now (3 years old), that he rolls out a pizza all by himself, but you might wanna help a bit the first few times.
  • Your toddler can prick holes in the pizza with a fork.
  • Your toddler can sprinkle cheese, oregano and veg on his own pizza.

pizza

My son is always extremely proud of his creation and walks to the oven to check on his pizza regularly. Both dad and son are big pizza lovers.

Pizza dough (for 2 adults and 1 toddler)

  • 500 gram plain flower and extra for dusting
  • 7 gram instant yeast
  • 1 1/2 tsp salt
  • 240 ml lukewarm water
  • Olive oil

Mix your flower, water, salt and yeast together. Cover the mixture with a kitchen towel and let this mixture stand for 10 minutes (you can skip this step, but I promiss you it makes the kneading easier.

Knead your dough for a minimum of 10 minutes. Time your kneading, it will seam like forever the first time, but after 10 minutes you will have that smooth, elastic stuff people like to rave about.

tip: knead your dough on a table top, not your kitchen counter. This lower surface makes it possible for you to use your body weight when pushing into the dough to stretch it.

Make sure your dough is covered in oil to protect it from sticking and place it in a large container. The dough (at least) will double in size. Make sure you prevent your dough from drying out by applying an air tight lid or use kling film. Now you have two choices: let your dough proof in the fridge for up to 24 hours, or proof it at room temperature for 1 hour.

pizza2

When you want to make your pizza, take the dough out of the fridge, knock it back and let it get to room temperature for at least 30 minutes. Now you can devide your dough into 2 large balls and one smaller ball. Protect your dough by covering it with a (damp) kitchen towel until you roll out your pizza.

Roll out your dough to form your pizza. Prick holes with a fork where the topping goes.

Place your toppings on your pizza and bake for 10 to 20 minutes at 220 degrees.

I will blog about my husband’s favorite pizza some other day.

Our little garden

I love growing my own veg and favorite flowers from seeds, and I have been searching for a way to get my toddler involved in this activity without letting him garden among my seedlings. This means my toddler should have his own patch of dirt in my poststamp sized garden.

I found the solution while searching garden ideas on pinterest: a fairy garden! Like the one you find on this blog.

fairy garden

creamerchronicles.blogspot.nl

I spent the cold moths of winter looking for some basic items for the fairy garden. A colleague supplied one inhabitant, and his donkey and the “home” came from the thrift store.

Garden

I painted the gnome house myself on a plain teapot. When it stops freezing my son and I will get started on the actual “gardening” in a big pot. To be continued….

Teapot2

Birthday surprise

Painting ceramics is surprisingly easy! I made this birthday plate for my nephew in 20 minutes. You do have to bake your plate in order to harden the paint.

VerjaardagsBord

I bought the plate from a thrift store and upcycled it in a few simple steps using:

  • permanent marker or sharpie pen
  • Decorfin Porcelain paint
  • Paint brushes

I drew my design with the permanent marker. I colored in my design using the Porcelain paint. I baked my plate in the oven for 45 minutes.

This plate can go in the dish washer. This way my nephew can eat of his birthday plate every year!

Try your own hand at making a personalized plate.

DecoBord